Mint (Mentha spp.) is one of the most versatile and fragrant herbs you can grow at home. Known for its refreshing aroma, flavor, and medicinal properties, mint enhances teas, desserts, salads, sauces, and even beverages. While growing mint from seeds is possible, propagating it from cuttings is faster, easier, and guarantees the same variety as the parent plant.
This guide provides a step-by-step, simplest method to grow fresh mint from cuttings, ensuring you can enjoy a continuous supply of aromatic, healthy leaves year-round right in your kitchen or garden.
Why Grow Mint From Cuttings
Growing mint from cuttings has several advantages over growing from seeds:
- Faster Growth: Cuttings establish roots in 1–2 weeks, while seeds take longer to germinate.
- Guaranteed Variety: Plants grown from cuttings inherit the exact characteristics of the parent mint plant.
- Low Cost: No need to buy seeds repeatedly; a single plant can provide multiple cuttings.
- Easy Propagation: Even beginners can successfully propagate mint using minimal tools.
- Continuous Harvest: Frequent cuttings encourage vigorous growth, providing a steady supply of leaves.
Using cuttings is the simplest, most reliable way to grow mint successfully at home.
Selecting Healthy Mint Cuttings
The first step in propagation is choosing the right cutting:
- Choose a healthy parent plant: Select a robust mint plant with vibrant green leaves. Avoid diseased or yellowing stems.
- Stem selection: Pick young, non-woody stems about 4–6 inches long. These are flexible, contain active growth nodes, and root easily.
- Node presence: Ensure the cutting has at least 2–3 nodes (where leaves attach), as these are the points where roots will form.
Selecting healthy cuttings increases your chances of rapid root development and vigorous plant growth.
Preparing Mint Cuttings
Proper preparation ensures successful rooting:
- Trim the Cutting: Cut just below a node using a sharp, sterilized knife or scissors.
- Remove Lower Leaves: Strip off the leaves from the lower 2 inches of the stem. This prevents rot and provides a clean area for rooting.
- Optional Rooting Hormone: While mint roots easily without hormone, dipping the cut end in rooting powder can speed up root formation.
Prepared cuttings are ready for propagation either in water or directly in soil.
Propagation Methods
Mint can be propagated using two simple methods: water rooting and soil planting. Both are easy and effective.
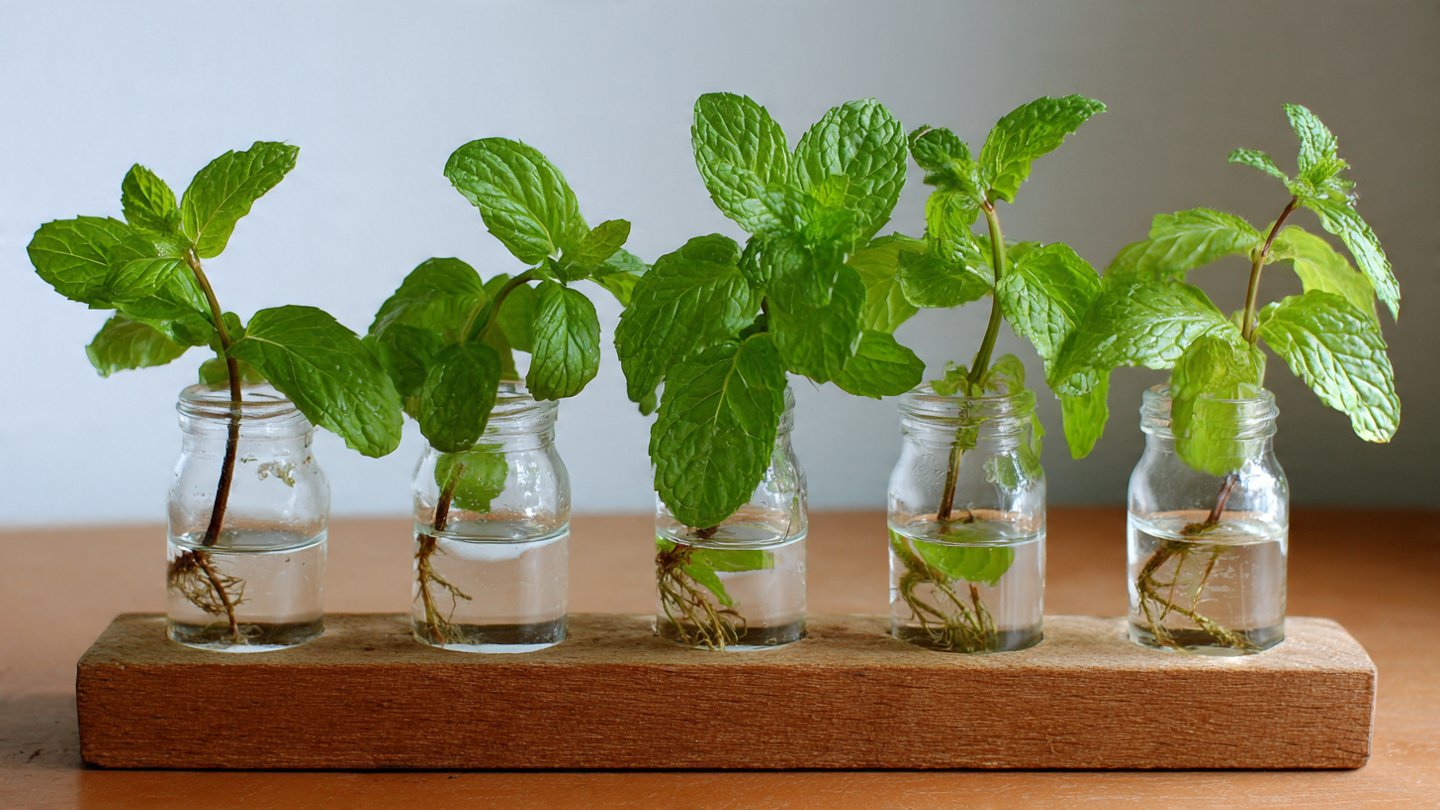
Method 1: Water Rooting
Water rooting is the most popular method for beginners.
- Container: Take a glass, jar, or cup and fill it with clean water.
- Insert Cutting: Place the stripped cutting into water, ensuring the nodes are submerged. Avoid submerging leaves.
- Sunlight: Place the jar in bright, indirect sunlight. Avoid direct, harsh sunlight that may scorch the stem.
- Change Water: Replace water every 2–3 days to keep it fresh and oxygenated.
- Root Development: Roots typically develop within 7–14 days. Once roots are 2–3 inches long, the cutting is ready to be transplanted into soil.
Water rooting is not only simple but allows you to monitor root growth visually, ensuring the cutting is healthy before planting.
Method 2: Soil Planting
Direct planting in soil is ideal if you want to grow mint immediately in its final container:
- Prepare Pot: Use a small pot with drainage holes and fill it with moist, well-draining potting mix.
- Plant the Cutting: Insert the stripped end of the cutting 1–2 inches into the soil. Firm the soil gently around the stem.
- Watering: Water lightly to keep the soil moist but not soggy.
- Humidity: Cover the cutting with a plastic bag or clear dome to retain humidity for the first week.
- Rooting: Roots will form in 2–3 weeks, after which the plant can be gradually exposed to normal indoor conditions.
Soil planting avoids the transplant shock that sometimes occurs when transferring water-rooted cuttings.
Caring for Newly Rooted Mint Plants
Once your mint cuttings have rooted, proper care ensures strong growth and a continuous supply of leaves:
1. Light Requirements
- Mint grows best in bright, indirect sunlight.
- Indoor mint can thrive near a south-facing window or under LED grow lights for 12–14 hours daily.
2. Watering
- Keep soil consistently moist but not waterlogged.
- Avoid letting the soil dry out completely, as young plants are sensitive to drought.
- Water at the base rather than over the leaves to reduce the risk of fungal diseases.
3. Fertilization
- Use a balanced liquid fertilizer every 3–4 weeks to promote lush foliage.
- Organic options like compost tea or fish emulsion work well for healthy, chemical-free growth.
4. Pruning and Harvesting
- Regular pruning encourages bushier growth and prevents leggy stems.
- Begin harvesting leaves once the plant has 5–6 sets of leaves.
- Pinch or cut the top 2 inches of stems to stimulate branching.
- Frequent harvesting encourages continuous leaf production throughout the year.
Repotting and Container Tips
Mint is a vigorous grower and may require repotting to maintain healthy roots:
- Container Size: Use pots 6–8 inches in diameter for young plants and upgrade to 12–14 inches as the plant grows.
- Drainage: Ensure pots have drainage holes to avoid waterlogging.
- Soil Refresh: Replace the top 2–3 inches of soil periodically or repot with fresh potting mix to maintain nutrient levels.
- Companion Planting: Mint can be grown alongside tomatoes, peppers, or basil to naturally repel pests.
Proper container management ensures vigorously growing mint plants indoors or on balconies.
Pest and Disease Management
Even indoor mint plants can encounter problems:
- Aphids and Spider Mites: Spray with neem oil or mild soapy water to control infestations.
- Powdery Mildew: Avoid overhead watering and ensure good air circulation.
- Root Rot: Caused by waterlogged soil; prevent by proper drainage.
Maintaining clean soil, proper watering, and good airflow reduces the risk of most common pests and diseases.
Tips for Year-Round Mint Supply
- Succession Cuttings: Propagate new cuttings every 4–6 weeks to ensure a continuous supply.
- Light Management: Supplement with grow lights during winter or low-light periods.
- Container Rotation: Rotate pots to ensure even sunlight exposure and prevent uneven growth.
- Harvest Timing: Harvest in the morning for the best aroma and flavor.
- Winter Care: Keep indoor mint near windows or under artificial light to maintain growth during colder months.
Following these tips ensures a steady, year-round supply of fresh, aromatic mint leaves.
Uses and Benefits of Homegrown Mint
Growing your own mint allows you to enjoy its culinary, medicinal, and aromatic benefits:
- Culinary Uses: Fresh leaves enhance teas, lemonades, salads, sauces, desserts, and cocktails.
- Health Benefits: Mint aids digestion, relieves headaches, and provides antioxidants.
- Aromatherapy: Fresh mint leaves release a refreshing aroma that naturally repels insects and freshens indoor air.
- DIY Products: Make mint-infused oils, mint pastes, or homemade herbal remedies.
Homegrown mint is fresher, more flavorful, and free from chemicals compared to store-bought varieties.
Conclusion
Growing mint from cuttings is the simplest and most efficient way to enjoy fresh, aromatic herbs at home. By selecting healthy cuttings, using either water or soil propagation, and providing proper care, even beginners can cultivate lush, flavorful mint plants indoors or in small outdoor spaces.
From propagation to harvest, every step—from preparing cuttings, rooting, potting, watering, fertilization, pruning, and pest management—contributes to a healthy, productive mint plant. With regular harvesting and care, your homegrown mint will provide a continuous supply of fresh leaves for culinary delights, beverages, and natural remedies all year round.
Mint is not only easy to grow but also adds greenery, fragrance, and utility to your home garden. With this simple method, you can transform a few cuttings into a flourishing mint herb garden, offering convenience, flavor, and wellness benefits every day.