Thyme, with its aromatic fragrance and culinary versatility, is a favorite herb in many kitchens and gardens. This hardy perennial is not only an essential seasoning for a wide variety of dishes, but it also adds a lovely fragrance to gardens and can even be used for medicinal purposes. While thyme is relatively easy to grow from seeds, propagating it from cuttings is a faster, more reliable way to expand your herb collection. Among the various propagation techniques, rooting thyme cuttings in water is one of the simplest and most effective methods. This article will guide you step-by-step on how to root thyme cuttings easily using the water method and help you create a thriving thyme garden with minimal effort.
Why Choose the Water Method for Thyme Cuttings?
When it comes to propagating thyme, gardeners often debate between soil propagation and water propagation. While soil propagation works, it can sometimes be slower and requires careful attention to moisture levels. On the other hand, the water method is:
- Simple and Low Maintenance: No need for specialized tools or soil mixtures. All you need is a clean container and water.
- Visual Progress Tracking: Since roots form in water, you can see them growing, which is satisfying and makes it easier to know when the cutting is ready to plant.
- Higher Success Rate: With the right cuttings and care, water propagation often yields stronger and healthier roots compared to some soil methods.
This method is perfect for both beginner and experienced gardeners who want a hassle-free way to multiply their thyme plants.
Step 1: Selecting Healthy Thyme Cuttings
The first step to successful propagation is choosing the right cuttings. Look for:
- Healthy Parent Plant: Pick cuttings from a thriving thyme plant with vibrant, green leaves and no signs of disease or pests.
- Non-Woody Stems: Select young to semi-woody stems. Avoid fully woody stems as they root more slowly.
- Length: Aim for cuttings that are 3–5 inches long. This length provides enough growth nodes for roots to develop while being manageable for your container.
Once you have your cuttings, use a clean pair of scissors or pruning shears to make a neat cut just below a leaf node. Leaf nodes are critical because roots often sprout from these points.
Step 2: Preparing Thyme Cuttings
Proper preparation of the cuttings ensures faster and healthier root growth:
- Trim the Leaves: Remove the leaves from the bottom half of the stem. This prevents leaves from rotting in the water and allows the stem to focus energy on root development.
- Optional Rooting Hormone: While not necessary, dipping the cut end in rooting hormone can encourage faster root growth. Thyme is hardy and generally roots well without it, but the hormone can provide an extra boost.
- Clean Water: Use room temperature, non-chlorinated water. Tap water is generally fine, but if possible, let it sit for a few hours to allow chlorine to dissipate.
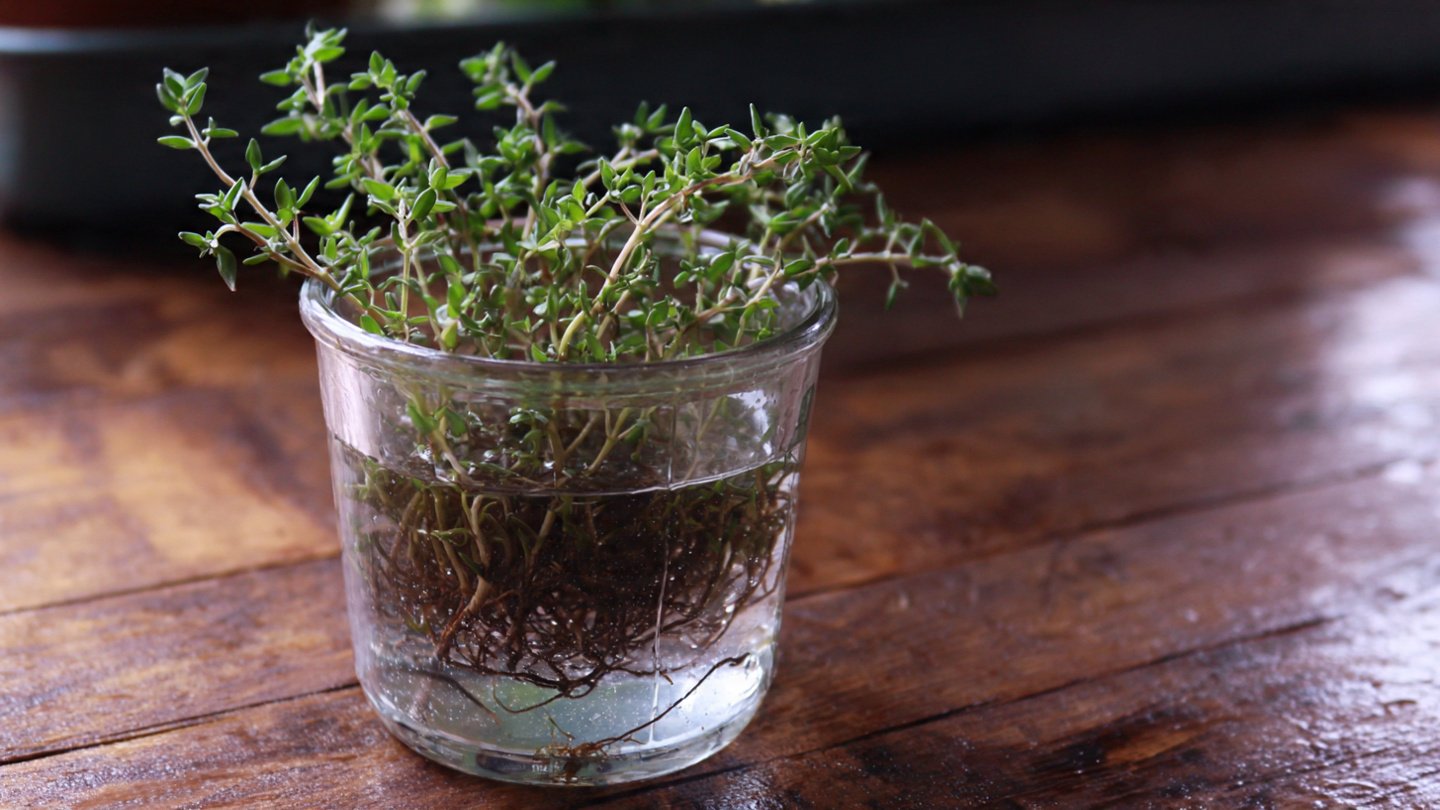
Step 3: Placing Cuttings in Water
Now comes the simple part – placing your thyme cuttings in water:
- Choose a Container: A small glass, jar, or cup works well. Make sure it’s clean to avoid bacterial growth that can harm the cuttings.
- Submerge the Stem: Place the cuttings in the water so that the leafless portion is submerged while the leaves remain above water. This ensures that only the stem nodes touch the water.
- Avoid Crowding: Give each cutting enough space. Overcrowding can lead to reduced oxygen and slower root growth.
Step 4: Providing the Right Environment
To encourage thyme roots to form quickly, you need to create a favorable environment:
- Light: Place the container in a spot with bright, indirect sunlight. Direct sunlight can heat the water too much and damage the cuttings.
- Temperature: Thyme prefers moderate temperatures. Avoid placing cuttings near heating vents or in cold drafts.
- Water Change: Replace the water every 2–3 days to prevent stagnation and bacterial buildup. Fresh water provides oxygen and nutrients that support root growth.
Step 5: Waiting for Roots to Develop
Patience is key when rooting thyme cuttings:
- Timeline: Most thyme cuttings will develop roots in 2–4 weeks. Some may take slightly longer depending on the variety and environmental conditions.
- Root Appearance: Look for small white or light brown roots emerging from the nodes. Once the roots reach around 1–2 inches in length, the cuttings are ready to be transferred to soil.
- Monitoring Health: If a cutting shows signs of rot (brown, mushy stem or foul odor), remove it immediately to prevent it from affecting other cuttings.
Step 6: Transferring Rooted Cuttings to Soil
After your thyme cuttings have established strong roots, it’s time to plant them in soil:
- Choose a Pot or Garden Spot: Select well-draining soil in a pot or garden bed. Thyme thrives in sandy or loamy soil with good drainage.
- Planting Depth: Dig a small hole and gently place the rooted cutting, ensuring the roots are fully covered but the leaves are above soil level.
- Initial Watering: Water the cutting lightly to settle the soil around the roots. Avoid overwatering, as thyme prefers slightly drier soil conditions.
- Acclimation: Keep the newly planted thyme in partial shade for a few days to reduce transplant shock, then gradually move it to a sunnier location.
Step 7: Ongoing Care for Your Thyme Plant
Once your thyme cuttings are in soil, follow these care tips to encourage robust growth:
- Sunlight: Thyme thrives in full sun (6–8 hours daily). Ensure your plant gets enough light for optimal growth.
- Watering: Allow the soil to dry out between waterings. Thyme is drought-tolerant and overwatering can lead to root rot.
- Pruning: Regularly trim the plant to promote bushier growth and prevent it from becoming woody.
- Fertilization: Thyme generally doesn’t require heavy feeding. A light application of compost or balanced fertilizer once a month during the growing season is sufficient.
Tips to Increase Success Rate
To make sure your thyme propagation project is successful, consider these additional tips:
- Use Healthy Stems: Avoid stems that look damaged or weak. Only strong, green stems will produce viable roots.
- Sterilize Tools: Always clean your scissors or pruning shears before cutting to prevent disease transmission.
- Multiple Cuttings: Propagate several cuttings at once to increase your chances of success. Even if a few fail, others are likely to thrive.
- Rotate Water Containers: If using multiple cuttings in different jars, rotate them to ensure even light exposure for uniform growth.
Advantages of Propagating Thyme in Water
The water propagation method for thyme offers several advantages beyond simplicity:
- Faster Growth Observation: Seeing roots develop in water is motivating and helps you gauge the optimal planting time.
- Reduced Soil-Borne Problems: Water propagation avoids potential soil pathogens that can harm delicate cuttings.
- Cost-Effective: No need for expensive pots, soil mixes, or special equipment. A glass and fresh water are all you need.
Common Problems and How to Avoid Them
Even with this easy method, you may encounter some challenges:
- Root Rot: Caused by leaving cuttings in stagnant water too long. Change water frequently and trim any decayed portions.
- Weak Growth: Often due to insufficient light. Make sure cuttings receive bright, indirect sunlight.
- Leaf Drop: Can happen when cuttings are stressed or overwatered. Ensure only the stem is submerged and leaves remain dry.
By paying attention to these factors, you can maximize your success rate and enjoy a healthy thyme harvest.
Conclusion
Propagating thyme using the water method is one of the easiest and most rewarding ways to expand your herb garden. With just a few simple steps – selecting healthy cuttings, preparing them properly, placing them in water, and providing the right conditions – you can enjoy thriving thyme plants without the fuss of complex gardening techniques. This method not only saves time but also allows you to witness the fascinating process of root formation firsthand.
Whether you’re a seasoned gardener or a beginner looking to grow your culinary herbs, this water propagation trick is a must-try. Soon, you’ll have a flourishing supply of thyme to enhance your cooking, add fragrance to your garden, and even create beautiful herb arrangements. So grab your scissors, select your healthiest thyme stems, and start rooting them in water today – your future herb garden will thank you!