Snake plants, also known as Sansevieria or mother-in-law’s tongue, are among the most popular houseplants worldwide. They are celebrated for their hardiness, air-purifying qualities, and striking upright leaves. One of the most satisfying aspects of snake plant care is propagation—multiplying your plant to fill more spaces in your home or share with friends.
While there are several propagation methods, the soil-based method is particularly reliable for producing healthy, vigorous new plants. Unlike water propagation, which can sometimes lead to root rot, the soil-based approach encourages stronger root development and better long-term growth. In this comprehensive guide, we’ll walk you through every step of propagating snake plants using soil, ensuring success even for beginner gardeners.
Why Propagate Snake Plants in Soil?
Propagation allows you to expand your collection without buying new plants. Snake plants are naturally resilient, but soil-based propagation offers specific advantages:
- Stronger Roots: Roots develop directly in a medium rich in nutrients, leading to healthier plants.
- Reduced Risk of Rot: Snake plants are prone to root rot if left in water too long; soil mitigates this risk.
- Faster Establishment: Plants grown in soil adapt quickly once transplanted into a larger pot.
- Ease of Maintenance: No need to transfer water-grown cuttings later; the plant remains in soil throughout.
Materials Needed for Soil-Based Propagation
Before starting, gather the following materials:
- Healthy parent snake plant (Sansevieria trifasciata)
- Sharp, sterilized knife or scissors
- Small pots or seedling trays
- Well-draining soil mix (preferably cactus or succulent mix)
- Gloves (optional, as some plants may cause mild skin irritation)
- Water spray bottle
Having everything ready ensures a smooth propagation process and reduces stress on the cuttings.
Step 1: Select Healthy Leaves for Propagation
The first step is choosing the right leaves to propagate. Healthy leaves are key to successful growth.
- Pick mature leaves that are firm, vibrant, and free of pests or disease.
- Avoid damaged, yellowing, or wilting leaves, as these are less likely to produce strong roots.
- For the best results, select leaves from the middle or lower section of the plant.
Step 2: Prepare the Leaf Cuttings
Once you’ve selected suitable leaves, prepare them for planting:
- Cut the Leaf: Using a sharp, sterilized knife or scissors, cut the leaf at its base, close to the soil line.
- Segment the Leaf: For larger leaves, cut them into 3–4 inch sections. Ensure you remember the original orientation—the bottom end of the cutting (closest to the roots) should be planted downward. Planting upside-down will prevent rooting.
- Dry the Cuttings: Allow the cut ends to callus over for 1–2 days. This reduces the risk of rot once planted. Place them in a dry, shaded area during this time.
Step 3: Prepare the Soil
Snake plants require a well-draining soil mix for healthy root development. A simple soil mix includes:
- 50% potting soil
- 25% sand or perlite
- 25% compost
This mixture ensures proper aeration, reduces the chance of waterlogging, and supplies essential nutrients. If using a commercial cactus or succulent mix, you can use it directly.
- Choose small pots or seedling trays with drainage holes to avoid water accumulation.
- Fill the pots about three-quarters full with the soil mix.
Step 4: Planting the Cuttings
Now that the cuttings and soil are ready, it’s time to plant:
- Insert the Cuttings: Plant each leaf section upright, burying the bottom end 1–2 inches into the soil. Do not push too deep, as this may cause rot.
- Spacing: Leave a little space between cuttings to allow airflow and prevent fungal growth.
- Firm the Soil: Gently press the soil around the base of each cutting to stabilize it. Avoid compacting too tightly, as roots need space to grow.
- Water Lightly: Mist the soil with a spray bottle to provide initial moisture. Avoid soaking the soil.
Step 5: Caring for Soil-Based Snake Plant Cuttings
Once planted, proper care is essential to ensure healthy growth.
1. Light
Snake plants prefer bright, indirect sunlight. Avoid direct sunlight on cuttings, as it may scorch them. A warm, shaded window is ideal.
2. Watering
- Keep the soil lightly moist but not wet. Overwatering is the most common cause of failure in propagation.
- Mist the soil once or twice a week, depending on the humidity in your home.
- Once roots begin developing (usually 4–6 weeks), water more thoroughly, allowing the soil to dry between waterings.
3. Temperature
Snake plants thrive in warm conditions. Maintain a temperature of 20–30°C (68–86°F) for optimal rooting. Avoid placing cuttings in drafty areas or near air conditioners.
4. Fertilization
- Avoid fertilizing during the initial rooting phase, as this may stress the cuttings.
- Once roots are established (after 2–3 months), apply a diluted, balanced liquid fertilizer once a month to encourage growth.
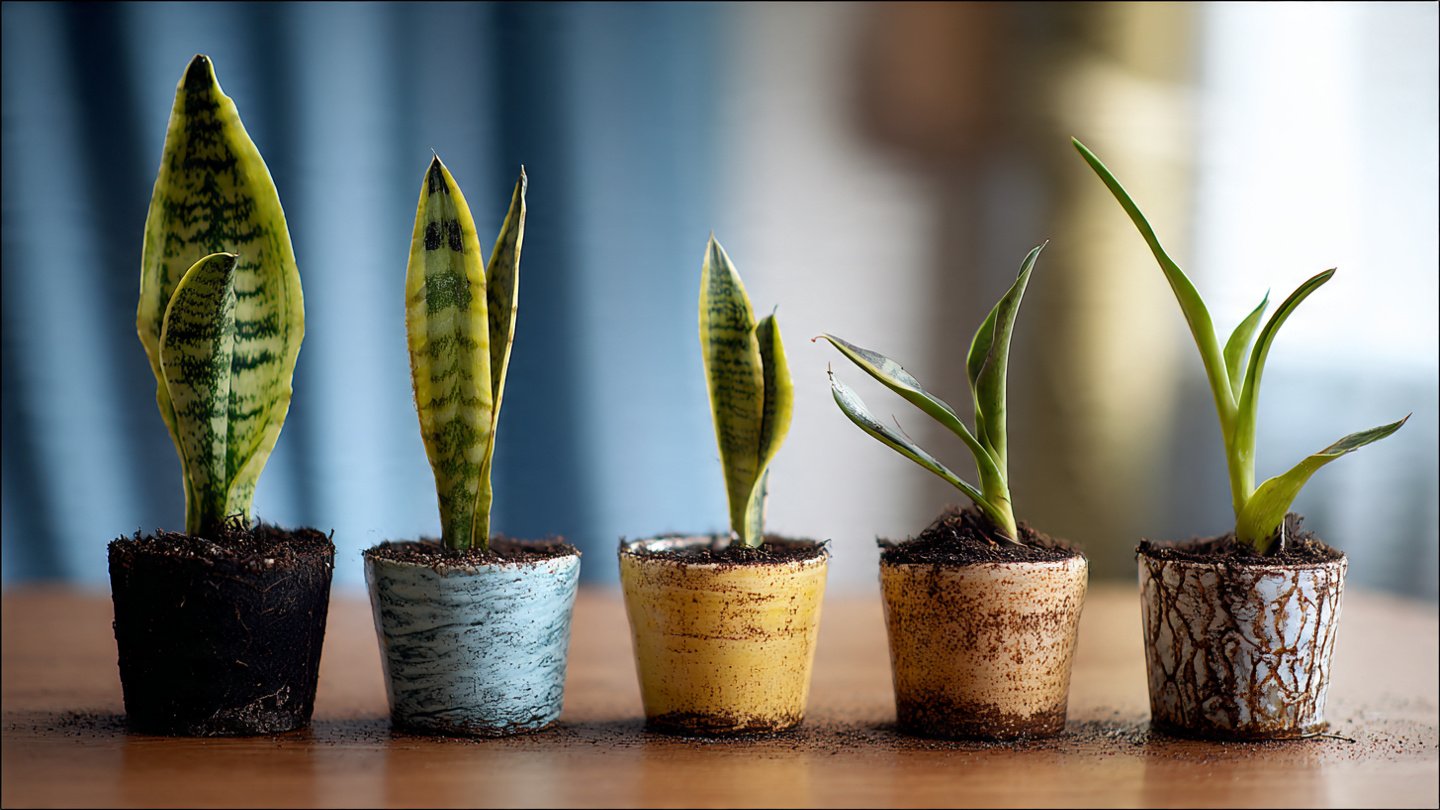
Step 6: Identifying Root Development
Snake plant cuttings root slowly, so patience is key. Signs of root development include:
- New Leaf Growth: The first indicator that the cutting is taking root is the appearance of new shoots from the top.
- Firm Base: Gently tug the cutting after 4–6 weeks. If it resists, roots have likely formed.
- Healthy Color: The cutting maintains its firmness and vibrant color without wilting.
Step 7: Transplanting Rooted Cuttings
Once the cuttings have developed a strong root system and new leaves, they can be transplanted into larger pots for continued growth:
- Choose a Larger Pot: Select a pot with good drainage, at least 6–8 inches deep.
- Prepare Soil: Use the same well-draining soil mix as before.
- Transplant Carefully: Gently remove the cutting from the propagation pot and plant it at the same depth as before.
- Water: Water lightly after transplanting and gradually return to a normal watering schedule.
Additional Tips for Healthy Growth
- Rotate Pots: Rotate plants occasionally to ensure even growth and prevent leaning.
- Avoid Overcrowding: Ensure each cutting has space for air circulation to reduce fungal infections.
- Inspect Regularly: Watch for signs of pests such as spider mites or mealybugs and treat promptly.
- Patience is Key: Snake plant propagation is slow but steady. Avoid digging up cuttings too early.
Advantages of the Soil-Based Method
Soil-based propagation is often preferred for several reasons:
- Durable Root System: Plants grown directly in soil develop stronger, more resilient roots.
- Lower Risk of Disease: Soil reduces the risk of rot compared to water propagation.
- No Transplant Shock: Unlike water-propagated plants, these cuttings don’t need to adjust to soil later.
- Better Long-Term Growth: Soil-propagated snake plants establish quickly and grow robustly over time.
Common Mistakes to Avoid
- Planting Cuttings Upside Down: Roots only form if the base is planted downward.
- Overwatering: Snake plants are highly drought-tolerant and can rot if the soil is soggy.
- Using Poor Soil: Heavy, clayey soil prevents root penetration and increases rot risk.
- Excess Sunlight: Direct sun can scorch new cuttings and slow growth.
Conclusion
Propagating snake plants using the soil-based method is a simple, effective way to expand your indoor garden. With careful selection of healthy leaves, proper soil preparation, and attentive care, you can grow strong, thriving plants that purify the air and beautify your home.
This method encourages robust root development, reduces the risk of rot, and produces plants ready for long-term growth. Whether you are a beginner or an experienced gardener, soil-based propagation provides a reliable way to enjoy more snake plants, share them with friends, or even create a stunning indoor green space.
By following this step-by-step guide, you can confidently propagate snake plants and watch your indoor garden flourish with healthy, vibrant greenery. Patience, care, and attention to detail are the keys to success—and with them, your snake plant propagation journey will be both enjoyable and rewarding.