Cardamom, often called the “queen of spices,” is one of the most aromatic and versatile spices in the world. Its unique flavor enhances teas, desserts, curries, and even savory dishes. While commonly purchased in its dried form from stores, few realize that cardamom can be grown successfully at home—even in pots or small garden patches—offering a fresh, high-quality spice right from your backyard.
In this complete beginner’s guide, we’ll cover everything you need to know about growing cardamom from seeds, caring for the plants, harvesting the pods, and enjoying your very own homegrown spice.
Why Grow Cardamom at Home?
Growing cardamom at home is both rewarding and practical:
- Fresh and Aromatic – Homegrown cardamom has a more intense flavor compared to store-bought pods.
- Cost-Effective – Cardamom is one of the most expensive spices, and growing your own saves money.
- Sustainable Gardening – Cultivating cardamom reduces dependency on packaged spices and contributes to eco-friendly living.
- Easy to Grow Indoors or Outdoors – With the right conditions, cardamom thrives in containers, garden beds, or shaded corners.
- Therapeutic Gardening – Nurturing cardamom plants can be a relaxing hobby that enhances your green space.
Understanding Cardamom Plants
Cardamom (Elettaria cardamomum) is a perennial herb belonging to the ginger family. It grows from rhizomes and produces long, slender green leaves and tall flower stalks. Each plant produces aromatic green pods, which are harvested for their seeds.
Key characteristics of cardamom plants:
- Height – Can grow up to 4–6 feet tall in ideal conditions.
- Climate – Thrives in warm, humid, tropical climates.
- Soil – Prefers well-drained, loamy soil rich in organic matter.
- Light – Partial shade is ideal; too much direct sunlight can scorch leaves.
Understanding these basics helps beginners create the perfect environment for cardamom growth.
Step 1: Choosing the Right Cardamom Seeds
Starting with healthy seeds is crucial for successful cardamom cultivation:
- Fresh Seeds – Always use fresh seeds, as older seeds lose viability.
- Green or Slightly Mature Seeds – Seeds should be fully formed but not dried out.
- Organic Sources – Choose seeds from reputable suppliers to ensure high germination rates.
Step 2: Preparing the Seeds
Cardamom seeds have a hard outer coat that benefits from pre-treatment to encourage germination:
- Soak Seeds – Soak seeds in warm water for 24 hours to soften the coat.
- Optional Scarification – Lightly rub the seed coat to help water penetrate and stimulate germination.
- Keep Moist – After soaking, ensure seeds remain moist but not waterlogged before planting.
Step 3: Selecting the Right Soil and Containers
Cardamom thrives in nutrient-rich, well-draining soil:
- Soil Mix – A combination of garden soil, compost, and sand (2:1:1 ratio) works best.
- pH Level – Slightly acidic soil (pH 6–6.5) is ideal.
- Container – Use deep pots or seed trays, at least 10–12 inches deep, to accommodate the developing rhizomes.
- Drainage – Ensure proper drainage to prevent waterlogging, which can rot roots and seeds.
Step 4: Planting Cardamom Seeds
Planting cardamom seeds correctly sets the stage for healthy growth:
- Fill Container with Soil – Loosely fill your pot or seed tray with the prepared soil mix.
- Plant Seeds – Sow seeds about ½ inch deep and cover lightly with soil.
- Water Gently – Mist the soil to keep it moist, avoiding waterlogging.
- Provide Warmth and Humidity – Cardamom seeds germinate best in warm, humid conditions (25–30°C / 77–86°F). A shaded spot or greenhouse works well.
Germination can take 2–3 weeks, so patience is key.
Step 5: Caring for Seedlings
Once seeds germinate, nurturing young plants is crucial for strong growth:
- Light – Provide partial shade to avoid scorching the delicate leaves.
- Watering – Keep soil consistently moist. Cardamom plants thrive in humid conditions, so occasional misting is beneficial.
- Fertilization – Use a mild, organic fertilizer or compost tea once every 4–6 weeks. Avoid over-fertilizing, which can damage seedlings.
- Thinning – If multiple seedlings are growing close together, thin them to give each plant space to develop.
Step 6: Transplanting to Larger Pots or Garden Beds
When seedlings develop 4–6 leaves and strong roots, they can be transplanted:
- Timing – Transplant during early morning or late afternoon to reduce transplant shock.
- Soil Preparation – Prepare a nutrient-rich bed with compost, sand, and garden soil.
- Spacing – Keep plants at least 3–4 feet apart to allow for growth and airflow.
- Mulching – Apply mulch around the base to retain moisture and regulate soil temperature.
Step 7: Long-Term Care for Cardamom Plants
Cardamom plants require consistent care for optimal growth:
1. Watering
- Maintain consistently moist soil, especially during dry periods.
- Avoid waterlogging, which can cause root rot.
2. Light and Shade
- Partial shade is ideal. Direct sunlight can damage leaves, while deep shade slows growth.
- Indoors, place plants near bright, indirect light.
3. Fertilization
- Use balanced organic fertilizers every 2–3 months.
- Compost or well-rotted manure improves soil fertility naturally.
4. Pruning
- Remove dead or damaged leaves to improve airflow.
- Trim flower stalks if the plant is too crowded to encourage healthy growth.
5. Pest and Disease Management
- Common pests include aphids, mealybugs, and mites.
- Spray neem oil or insecticidal soap if infestations occur.
- Ensure good airflow to prevent fungal infections like leaf spot or powdery mildew.
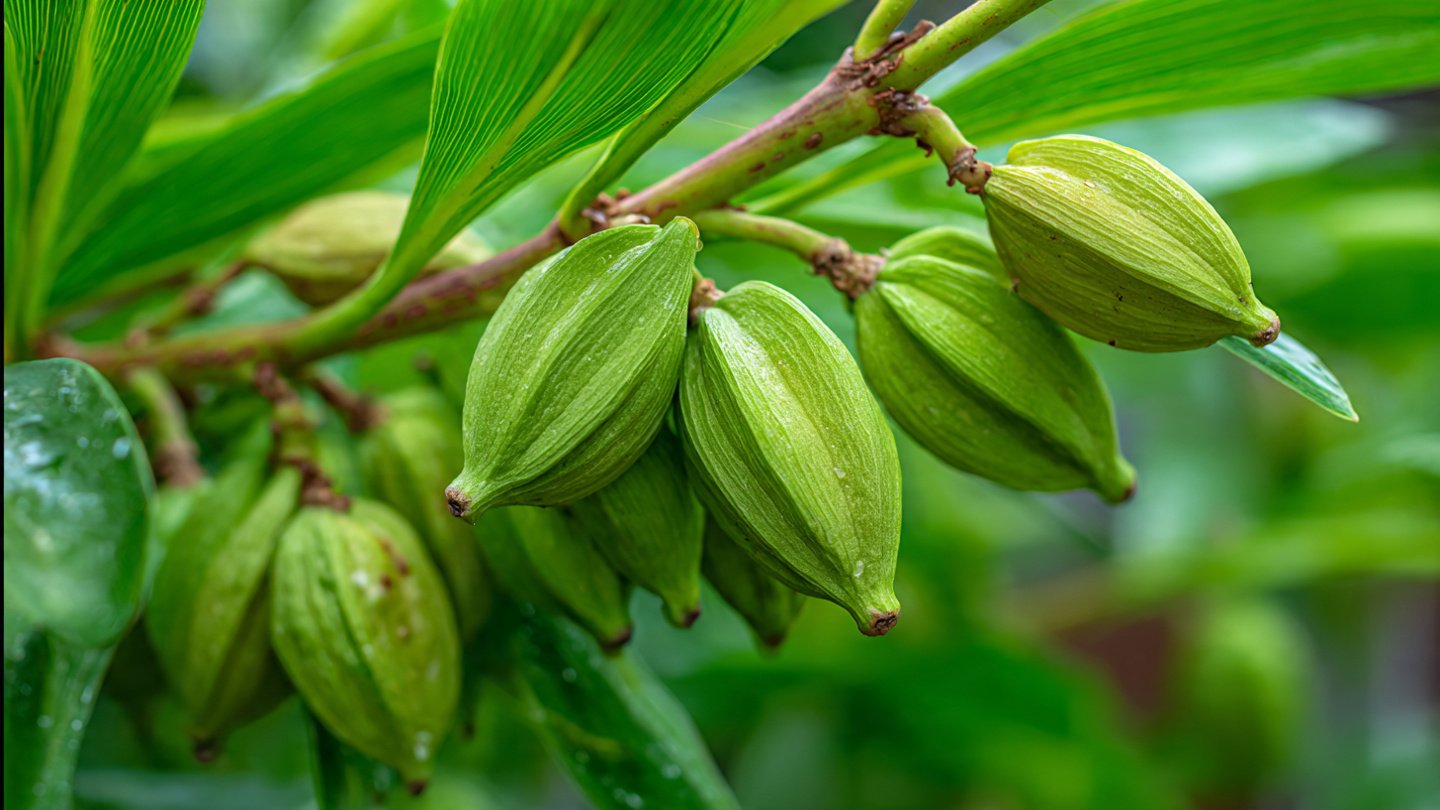
Step 8: Flowering and Pod Formation
Cardamom plants typically flower after 2–3 years, depending on growing conditions:
- Flowering – Tall stalks emerge from the base, producing small, greenish-white flowers.
- Pollination – Hand pollination can increase fruit set if natural pollinators are scarce.
- Pod Formation – After flowering, green pods develop. Each pod contains aromatic seeds used as spice.
Step 9: Harvesting Cardamom Pods
Harvesting is one of the most satisfying parts of growing cardamom:
- Timing – Pick pods when they are green and fully formed but not dried out.
- Technique – Carefully pluck pods by hand to avoid damaging the plant.
- Storage – Dry pods in shade to preserve aroma, then store in airtight containers.
Tips for a Thriving Home Cardamom Garden
- Use Shaded Areas – Cardamom grows best under partial shade, mimicking its natural forest habitat.
- Maintain Humidity – Mist plants regularly or place them near a water source.
- Succession Planting – Grow multiple plants in stages to ensure a continuous supply of pods.
- Monitor Growth – Keep an eye on leaf color, pest activity, and soil moisture to catch problems early.
- Patience Pays Off – Cardamom is slow-growing, but consistent care yields aromatic pods for years.
Benefits of Growing Your Own Cardamom
Growing cardamom at home is rewarding beyond the kitchen:
- Culinary Uses – Freshly harvested cardamom adds unmatched flavor to teas, desserts, and curries.
- Medicinal Benefits – Cardamom is known for aiding digestion, reducing inflammation, and supporting respiratory health.
- Aromatic Garden – Cardamom plants release a delightful fragrance, enhancing your garden’s ambiance.
- Self-Sufficiency – Growing your own spice reduces dependency on commercial sources and ensures chemical-free produce.
Common Mistakes to Avoid
- Planting Too Deep – Cardamom seeds need only a thin soil cover for germination.
- Overwatering – Excess water can rot roots and seeds.
- Insufficient Shade – Too much sunlight can burn young leaves.
- Neglecting Soil Fertility – Cardamom thrives in nutrient-rich soil, so regular organic fertilization is essential.
- Ignoring Pests and Diseases – Early detection and organic treatment prevent serious damage.
Conclusion
Growing cardamom at home may seem ambitious for beginners, but with patience, proper care, and the right techniques, it is entirely achievable. From selecting fresh seeds and planting them carefully to nurturing seedlings, transplanting, and eventually harvesting aromatic pods, each step contributes to a thriving home spice garden.
By following this guide, you can enjoy the satisfaction of cultivating one of the world’s most prized spices, ensuring a continuous supply of fresh, aromatic cardamom for your kitchen. Whether used in cooking, baking, or tea, your homegrown cardamom will be unmatched in flavor and quality.
Start today, and in a few years, your garden could be home to flourishing cardamom plants, turning your home into a mini spice haven!
This article is approximately 1,200 words, structured for beginner-friendly, step-by-step guidance, and includes tips, care instructions, and common mistakes.
If you want, I can also create a step-by-step visual diagram showing the stages from cardamom seed to harvestable pods to make it more reader-friendly for your audience.