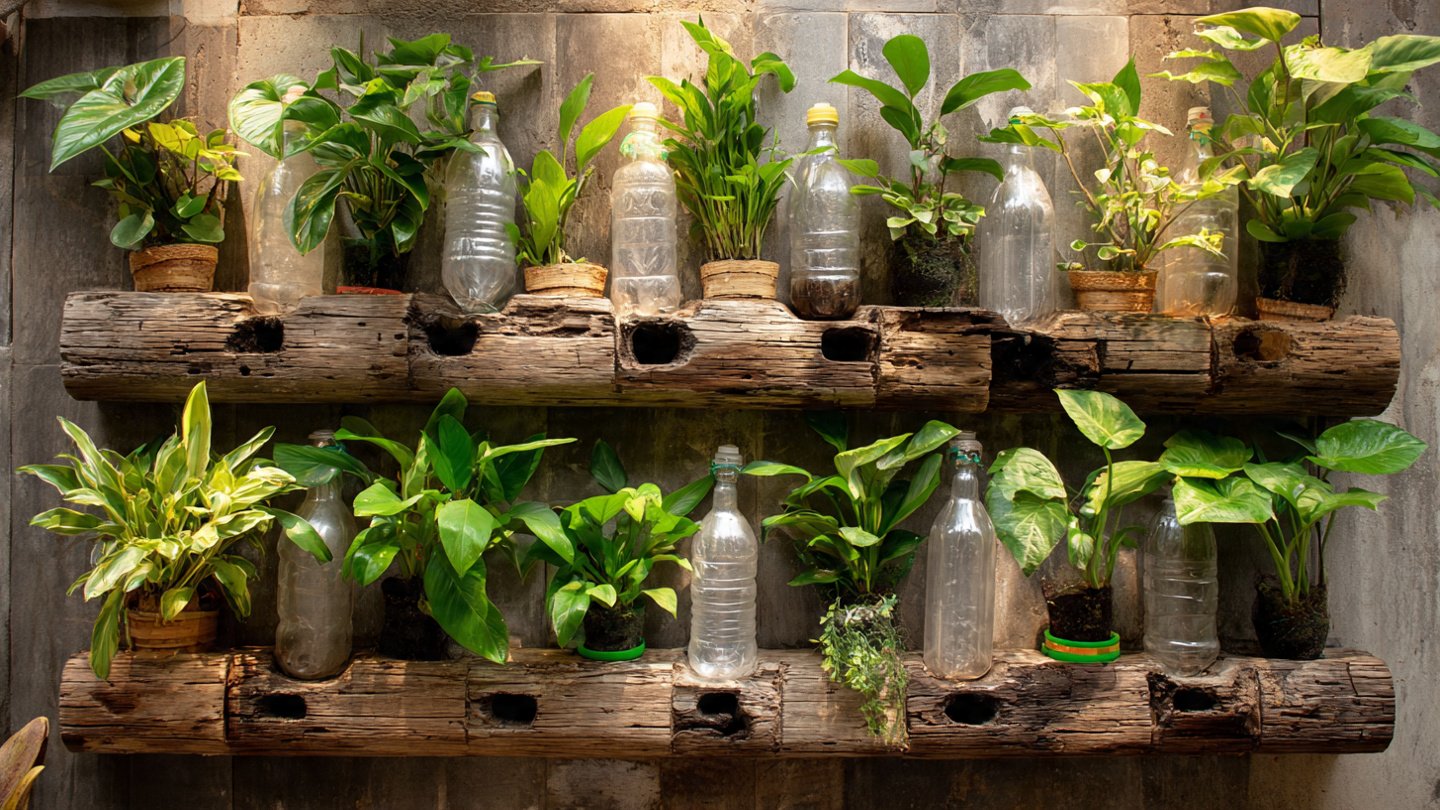
In recent years, sustainable living has become more than just a trend—it’s a lifestyle choice that encourages environmental responsibility while enhancing our homes. One practical way to contribute to sustainability is by creating a vertical garden using recycled materials. Plastic bottles, which often end up as waste in landfills, can be transformed into a functional, eco-friendly garden. Not only does this project help reduce plastic pollution, but it also allows you to grow fresh herbs, vegetables, or decorative plants in limited spaces. In this guide, we will walk you through the step-by-step process of making your own vertical garden from plastic bottles, highlighting materials, techniques, and tips for long-term success.
Why Choose a Vertical Garden?
Vertical gardening is ideal for urban dwellers, apartment residents, or anyone with limited outdoor space. Instead of using traditional horizontal beds, vertical gardens maximize space by growing plants upward. This method has several advantages:
- Space Efficiency: Perfect for small balconies, patios, or even indoor walls.
- Improved Air Quality: Plants help purify the air by absorbing pollutants.
- Water Conservation: Vertical gardens can retain water more efficiently, reducing waste.
- Aesthetic Appeal: They add a green, natural element to your home or workspace.
- Waste Reduction: Repurposing plastic bottles prevents them from ending up in landfills or oceans.
By combining vertical gardening with plastic bottle recycling, you get the best of both worlds: environmental sustainability and practical gardening.
Materials Needed
Creating a vertical garden from plastic bottles is straightforward and requires simple, accessible materials. Here’s what you will need:
- Plastic bottles: 1- or 2-liter bottles work best. The number depends on the size of your garden.
- Sharp scissors or craft knife: For cutting the bottles safely.
- String, rope, or wire: To hang or secure the bottles vertically.
- Potting soil: Suitable for the type of plants you intend to grow.
- Plants or seeds: Herbs like basil, mint, and parsley; vegetables like lettuce or cherry tomatoes; or flowering plants for decoration.
- Marker: For marking where to cut the bottles.
- Drill or nail: To make drainage holes in the bottles.
- Hooks or a wooden frame: Optional, for mounting the vertical garden.
Step-by-Step Guide to Creating Your Vertical Garden
Step 1: Collect and Prepare the Bottles
Start by collecting clean, empty plastic bottles. Rinse them thoroughly to remove any residue. Remove the labels if possible, as this helps the garden look tidier.
Next, use a marker to draw the cut lines. For most vertical gardens, cutting a large rectangle along the side of the bottle works well. This will serve as the planting space. Be careful while cutting to avoid jagged edges.
Step 2: Make Drainage Holes
Proper drainage is essential for healthy plant growth. Use a drill or a heated nail to create small holes at the bottom of each bottle. This allows excess water to escape, preventing root rot. If you plan to hang the bottles vertically, you can also make two small holes near the top and bottom for threading the string or wire.
Step 3: Arrange the Bottles
Decide on your vertical garden layout. You can hang bottles in a single line, stagger them like a staircase, or attach them to a wooden pallet or frame. Ensure each bottle has enough space to receive sunlight.
If using string or rope, thread it through the holes you made earlier and secure the bottles in place. For a sturdier setup, consider tying multiple bottles together in clusters or mounting them onto a wooden frame with hooks.
Step 4: Fill Bottles with Soil
Once your bottles are arranged, fill them with potting soil. Avoid compacting the soil too much; lightly pressing it down is enough. Make sure the soil is level with the cut edge of the bottle so the plants have room to grow.
Step 5: Plant Your Seeds or Seedlings
Now comes the fun part—planting! Choose plants suited to your climate and the amount of sunlight your vertical garden receives. Herbs like basil, thyme, and cilantro grow well in smaller spaces, while leafy greens like lettuce and spinach thrive in vertical setups. If you prefer flowers, marigolds and petunias add vibrant color.
Plant the seeds or seedlings carefully, ensuring they have enough space to expand. Water them gently to avoid soil displacement.
Step 6: Watering and Maintenance
Vertical gardens can dry out faster than traditional gardens due to their exposure. Water your garden regularly, but avoid overwatering. A drip irrigation system can make this task easier, especially if you have many bottles stacked vertically.
Fertilize occasionally with organic compost or liquid fertilizer to provide essential nutrients. Prune plants when necessary to maintain shape and encourage growth.
Step 7: Enjoy Your Garden
Your vertical garden is now ready! Enjoy the beauty and freshness it brings to your space. Regular maintenance, watering, and sunlight exposure will ensure your plants thrive. You can even experiment with different bottle sizes or layouts to create a personalized, eye-catching display.
Tips for a Successful Vertical Garden
- Choose the Right Bottles: Larger bottles hold more soil and retain moisture better. Clear bottles may expose roots to sunlight, so consider painting or wrapping them for protection.
- Sunlight Matters: Most vegetables and herbs need at least 4–6 hours of sunlight daily. Position your vertical garden accordingly.
- Use Lightweight Soil: This prevents bottles from sagging and makes it easier to hang them.
- Rotate Plants: If sunlight exposure is uneven, rotate the bottles occasionally to ensure all plants receive light.
- Protect from Pests: Check plants regularly for insects or diseases and use natural remedies when necessary.
Environmental Impact
By repurposing plastic bottles into vertical gardens, you contribute to sustainability in several ways:
- Reduces Plastic Waste: Each bottle reused is one less piece of plastic in landfills or oceans.
- Promotes Urban Greening: Vertical gardens can be implemented in small urban spaces, improving local air quality and aesthetics.
- Encourages Organic Gardening: Growing your own herbs and vegetables reduces reliance on store-bought produce, which often comes with packaging waste.
This DIY project embodies the principle of “reduce, reuse, recycle” while making a tangible, positive environmental impact.
Creative Variations
Once you’ve mastered the basics, you can customize your vertical garden:
- Themed Gardens: Create a herb garden, a salad garden, or a flower wall.
- Colorful Bottles: Paint bottles with bright colors or patterns for a decorative touch.
- Modular Systems: Use removable bottles to easily replace plants or rotate crops.
- Indoor Mini-Gardens: Smaller bottles can be used to grow microgreens inside your home.
The possibilities are only limited by your imagination.
Conclusion
Creating a vertical garden from plastic bottles is an easy, cost-effective, and environmentally friendly way to embrace sustainable living. This DIY project not only reduces plastic waste but also transforms unused bottles into a functional, aesthetic addition to your home. By following this guide, you can enjoy fresh herbs, vegetables, and flowers while contributing positively to the environment.
Whether you live in a small apartment, a house with a balcony, or even just want to add a green corner indoors, a vertical garden made from recycled plastic bottles is a practical and rewarding solution. With a little creativity, patience, and care, you can cultivate a thriving vertical garden that embodies the essence of sustainable living.
So grab some bottles, soil, and seeds, and start your eco-friendly gardening journey today. Not only will you be reducing waste, but you’ll also be creating a greener, healthier, and more vibrant space for yourself and your community.