There’s something immensely satisfying about biting into a homegrown, sun-ripened melon. Whether it’s a crisp cantaloupe, a refreshing watermelon, or a fragrant honeydew, melons grown at home are not only sweeter than store-bought varieties but also free from harmful pesticides. The best part? You don’t need acres of farmland to enjoy a fruitful harvest—even a small garden beside your house can yield juicy melons if you follow simple and effective gardening methods.
This guide will walk you through everything from soil preparation and planting to watering, pest control, and harvesting, helping you cultivate melons successfully and enjoy a delicious reward right in your backyard.
Step 1: Choosing the Right Melon Varieties
Before planting, it’s important to select melon varieties suitable for home gardens and your climate. Consider:
- Cantaloupe (Muskmelon): Sweet, aromatic, and ideal for smaller spaces if you train them to grow vertically.
- Watermelon: Needs more space but can be grown in compact forms using smaller varieties like “Sugar Baby” or “Icebox.”
- Honeydew: Smooth-skinned and sweet, suitable for warm climates with full sun.
- Mini Melons: Perfect for container gardens and small spaces, producing fruit in as little as 70 days.
Choosing the right variety ensures high yields, manageable growth, and optimal flavor.
Step 2: Selecting the Ideal Planting Spot
Melons are sun-loving plants and need a well-drained, nutrient-rich site for optimal growth:
- Sunlight: At least 6–8 hours of direct sunlight daily is essential.
- Soil: Loose, sandy-loam soil enriched with organic matter is ideal. Melons prefer slightly acidic to neutral soil (pH 6.0–7.0).
- Space: Give vining varieties enough room to spread, or use trellises to grow them vertically.
- Protection: Choose a site that is sheltered from strong winds to prevent vines from breaking.
A well-chosen location ensures healthy growth and high-quality fruit.
Step 3: Preparing the Soil
Healthy soil is the foundation of a sweet harvest. Follow these steps:
- Clear the Area: Remove weeds, rocks, and debris.
- Loosen the Soil: Till to a depth of 12–15 inches to allow roots to penetrate easily.
- Add Organic Matter: Mix in compost, well-rotted manure, or peat moss to improve fertility and moisture retention.
- Optional Fertilization: A balanced fertilizer with equal N-P-K (nitrogen, phosphorus, potassium) can boost early growth.
Melons thrive in fertile, well-drained soil, which enhances vine growth, flowering, and fruit development.
Step 4: Planting Melons
Melons can be started from seeds or seedlings. Here’s how to plant them for best results:
- Timing: Plant seeds after the last frost date, when soil temperatures reach 70°F (21°C) or higher.
- Spacing: Space hills 2–3 feet apart for cantaloupes and honeydews; watermelons need 3–5 feet between plants.
- Depth: Sow seeds 1 inch deep, covering lightly with soil.
- Watering: Moisten soil gently after planting to support germination.
- Transplanting Seedlings: If using seedlings, transplant carefully to avoid disturbing roots, and water immediately after planting.
Proper planting ensures strong roots, healthy vines, and early flowering.
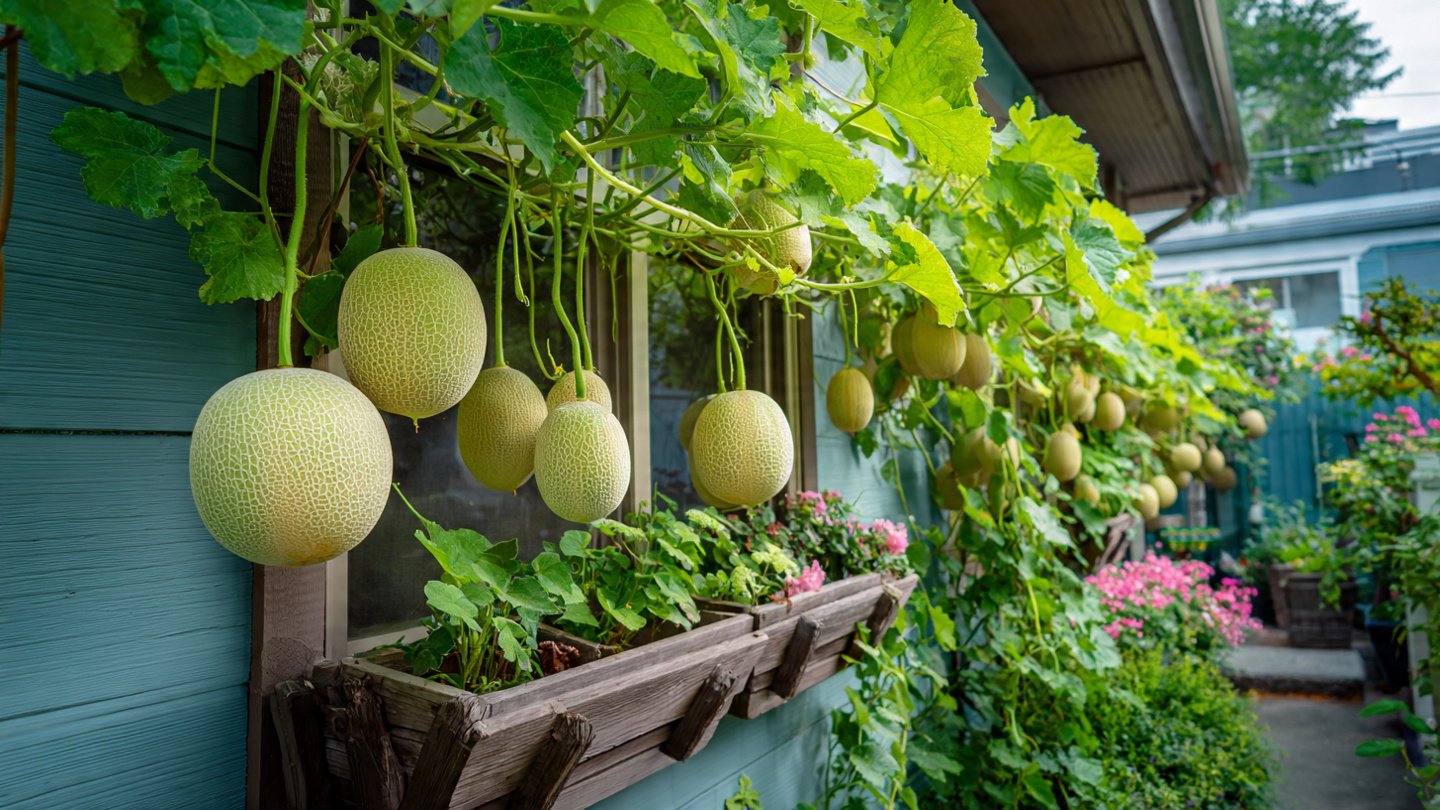
Step 5: Supporting Vines for Small Spaces
If space is limited beside your house, vertical growth techniques are key:
- Trellises: Sturdy trellises can support melon vines, keeping fruit off the ground.
- Netting or Cages: Use netting to guide vines upward, preventing sprawling.
- Fruit Support: For heavier fruits, use slings made from cloth or netting to prevent vines from breaking.
- Pruning: Remove excess side shoots to direct energy to main vines and fruit.
Vertical gardening not only saves space but also improves air circulation, reducing disease risk.
Step 6: Watering for Juicy Melons
Melons require consistent moisture, especially during flowering and fruiting:
- Deep Watering: Water 1–2 inches per week, soaking the root zone thoroughly.
- Avoid Overhead Watering: Use drip irrigation or soaker hoses to prevent leaf diseases.
- Mulching: Apply 2–3 inches of straw, grass clippings, or organic mulch to retain soil moisture and regulate temperature.
- Reduce Water Near Harvest: Lower watering frequency as fruits ripen to improve sweetness.
Consistent and careful watering ensures juicy, sweet, and flavorful melons.
Step 7: Fertilization During Growth
To support vigorous vine growth and fruit development:
- Early Growth: Apply nitrogen-rich fertilizer to promote leafy growth.
- Flowering and Fruiting: Switch to phosphorus and potassium-rich fertilizer to support blooms and fruit development.
- Foliar Feeding: Light foliar sprays with seaweed extract or liquid compost can boost plant health and productivity.
Proper fertilization maximizes fruit size, sweetness, and overall yield.
Step 8: Pollination for Fruit Production
Melons rely on bees and other pollinators for fruit set:
- Encourage Pollinators: Plant flowers nearby, avoid pesticides, or install a small bee house.
- Hand Pollination: In areas with low pollinator activity, gently transfer pollen from male flowers to female flowers using a soft brush.
- Timing: Pollination is most effective in the morning when flowers are fully open.
Effective pollination is crucial for fruit development and maximum yield.
Step 9: Pest and Disease Management
Home-grown melons are vulnerable to a few common pests and diseases:
- Pests: Aphids, cucumber beetles, spider mites, and squash bugs can damage vines. Use neem oil, insecticidal soap, or companion planting for control.
- Diseases: Powdery mildew, downy mildew, and fusarium wilt can affect leaves and stems. Ensure good air circulation, space plants properly, and remove infected leaves.
- Preventive Measures: Rotate crops yearly, avoid overhead watering, and maintain clean garden tools.
Regular monitoring keeps your melon plants healthy and productive.
Step 10: Harvesting Melons at Peak Ripeness
Knowing when to harvest ensures maximum sweetness and juiciness:
- Cantaloupe: Ripe when the stem easily slips off, the netting on the skin turns beige, and aroma is strong.
- Watermelon: Ripe when the underside turns creamy yellow, the tendril near the fruit dries, and the surface sounds hollow when tapped.
- Honeydew: Ripe when the skin turns pale yellow and the blossom end gives slightly under pressure.
- Harvest Timing: Generally, melons take 70–90 days to mature depending on variety and growing conditions.
Proper timing is key for sweet, flavorful melons that delight the palate.
Step 11: Extending the Growing Season
If you want melons to thrive longer beside your house:
- Use Row Covers: Protect young plants from frost or pests early in the season.
- Plastic Mulch: Keeps soil warm and retains moisture, encouraging faster growth.
- Container Gardening: Move pots to sunny spots for extended sunlight exposure.
- Succession Planting: Sow additional seeds every 2–3 weeks to stagger harvest.
Season extension techniques help maximize yield and enjoy fresh melons longer.
Step 12: Companion Planting and Garden Harmony
Planting melons with complementary crops boosts health and productivity:
- Corn and Beans: Provide shade and support without crowding.
- Marigolds and Nasturtiums: Repel harmful pests naturally.
- Basil and Oregano: Enhance growth and deter insects.
- Avoid Plants: Don’t plant melons near potatoes or members of the squash family that attract similar pests.
Companion planting promotes a healthy, balanced, and productive garden ecosystem.
Conclusion
Growing melons beside your house is entirely achievable with simple, practical gardening methods. By selecting the right varieties, preparing nutrient-rich soil, supporting vines, watering carefully, and encouraging pollinators, you can enjoy a sweet harvest that rivals store-bought fruit.
From vertical gardening to strategic fertilization and pest management, each step contributes to healthy, juicy, and flavorful melons. With patience and consistent care, even a small backyard or side garden can yield an abundance of melons that brighten your meals and bring the joy of homegrown produce to your table.
With these simple techniques, you’ll soon discover the satisfaction of harvesting melons straight from your garden, savoring the unmatched taste and freshness that only home cultivation can provide.